Inspection and Analysis Solution for Quality Management of Lithium-ion Rechargeable Batteries
Highlight
While lithium-ion rechargeable batteries are used in a wide range of products, there have also been reports of their overheating or catching fire. As internal short-circuits are one mechanism by which this happens, preventing batteries from being contaminated by the metallic impurities that can cause short circuits is a never-ending task. Hitachi High-Tech Corporation is supporting these efforts to eliminate metallic impurities through initiatives that include the development of an X-ray particle contaminant analyzer specifically for lithium-ion rechargeable battery materials. This analyzer can inspect for and analyze such impurities in only a few tens of minutes, rather than the several hours required in the past. By expanding the scope of application of this technology, Hitachi has succeeded in also providing a way to inspect for metallic impurities in electrodes coated with metal oxides, something that has not been practical using previous in-line inspection systems that have operated using visible light. In addition to existing SEM images and elemental assay, this new technique can also use the SEM to determine the 3D shape of these impurities by means of 3D imaging software. This article describes inspection and analysis tools for overcoming the production challenges facing lithium-ion rechargeable battery manufacturers.
Introduction
The transition to a decarbonized society is being promoted around the world against a background of ever-worsening climate change and global warming. One feature of this transition is encouragement for the wider adoption of zero-emission electric vehicles (EVs) accompanied by restrictions on the sale of new vehicles powered by internal combustion engines. Alongside this greater use of EVs has come a rapid expansion over the past few years in the production of automotive lithium-ion rechargeable batteries (LIBs)(1).
Predating their use in vehicles, LIBs are also widely used in consumer electronics. Given reports of LIBs overheating or catching fire, safety has become the key concern in the production of automotive LIBs(2)–(4). The risk when an internal short-circuit occurs due to problems such as the battery being contaminated by impurities is that the resulting overheating or fire will lead to a thermal runaway effect driven by release of stored electrical energy(5)–(7). As conductive metallic impurities have a high likelihood of forming a path between the cathode and anode both physically and chemically, preventing them is a vitally important part of battery production, both to improve safety and extend battery life and to increase the yield of the production process. This is why LIB production facilities are equipped with systems for eliminating metallic impurities and for their inspection and analysis.
This article describes a quality management solution and associated technologies for use in the LIB production process with inspection and analysis systems supplied by Hitachi High-Tech Corporation to help battery manufacturers overcome these production challenges.
Inspection and Analysis Techniques for LIB Quality Management
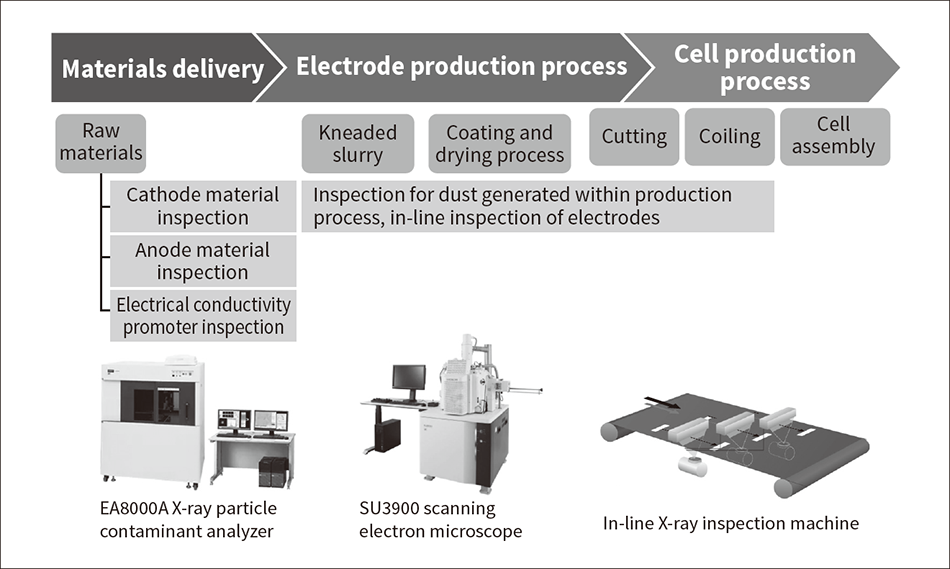
Figure 1 — Inspection and Analysis Systems for Metallic Impurities in Production Process for Lithium-ion Rechargeable Batteries The EA8000A and SU3900 that are used to sample inspection of raw materials for metallic impurities and for particle analysis of in-process dust are utilized to perform an elemental assay of these impurities as well as obtaining information on particle size and particle count. The in-line X-ray inspection machine, meanwhile, can identify the locations of metallic impurities in electrode plates.
LIB quality management requires dealing with metallic impurities from the acceptance inspection of material deliveries through to production process management. In response, Hitachi High-Tech has developed an X-ray particle contaminant analyzer and an in-line X-ray inspection machine that utilize X-ray techniques applicable to LIBs, as well as a scanning electron microscope (SEM) as the tools needed for the inspection and analysis of metallic impurities.
For the X-ray particle contaminant analyzer, Hitachi devised a new transmission X-ray imaging technique that shortens the time required for inspection measurement, making possible the rapid detection of metallic impurities as small as 20 µm over a 250 mm × 200 mm area. Furthermore, by mounting this transmission X-ray imaging system together with a fluorescent X-ray analysis system on the same XYZ axis drive stage, the analyzer is able both to detect metallic impurities and to analyze their composition.
In addition to sample testing, there is also growing demand for testing systems that can check for metallic impurities in all electrode plates as they are produced. While such in-line X-ray inspection machines for detecting contaminants already exist, they are not good at detecting metallic particles of the size found in the LIB electrode production process and also struggle to deal with the high line speed. In response, Hitachi leveraged the transmission X-ray imaging technique used on the X-ray particle contaminant analyzer to develop a high-speed/high-resolution time delay integration (TDI) camera with the capabilities needed for in-line inspection in electrode production, thereby enabling real-time monitoring for metallic impurities to be performed for all electrode plates as they move through the production process. This means that, even given the anticipated volume growth in LIB electrode plate production, all of this production can be checked for metallic impurities, both to eliminate battery components that might result in the production of defective LIBs and to provide feedback to the anti-contamination measures used in upstream processes.
SEMs can be used both to observe the shape of impurities and to analyze them by means of energy-dispersive X-ray spectroscopy (EDX). This augments the SEM’s high-resolution shape observations with three-dimensional (3D) analysis of impurities and a height measurement function. These SEM/EDX systems can also perform these measurements over a region as wide as 229 mm in diameter (depending on the instrument model). Stage speed has also been increased to shorten measurement time and Hitachi has succeeded in strengthening the intensity of the X-rays used in analysis by increasing the current of the incident electron beam, making it easy to detect particles that are only a few microns in size. As the system is also sensitive to light elements such as oxygen, it can detect and identify oxides and other compounds as well as metals (see Figure 1).
Acceptance Inspection of Battery Material Deliveries
Figure 2 — Use of EA8000A to Check for Metallic Impurities in Electrical Conductivity Promoter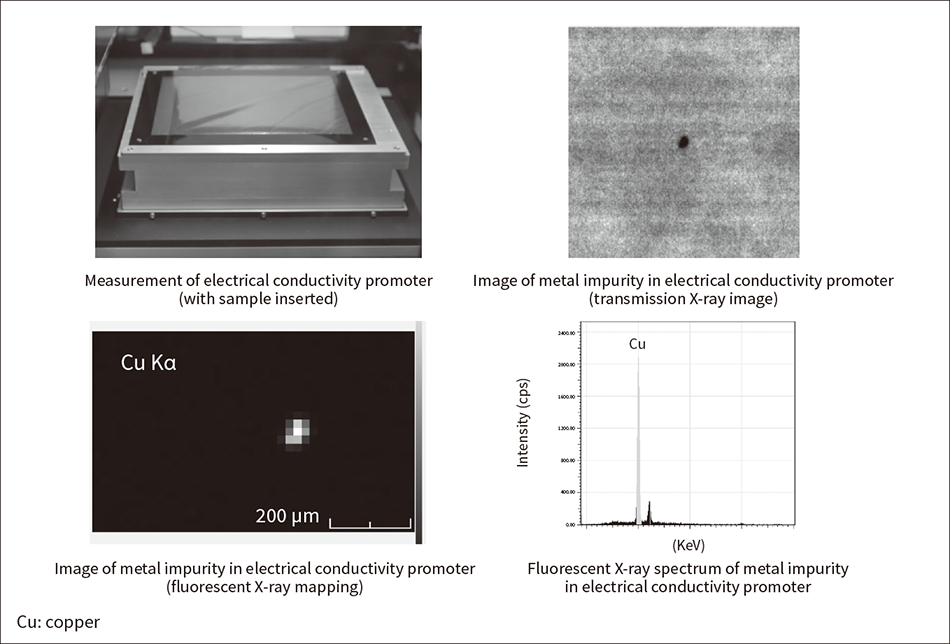 Checking electrical conductivity promoter for metallic impurities is performed using bagged samples (top left). Inspection is extremely simple and effective, with automation of the steps from acquiring the transmission X-ray image of the sample through to using image analysis to automatically detect contaminants and fluorescent X-ray analysis to determine their elemental composition.
Identifying and preventing metallic impurities in raw materials is an important task in LIB manufacturing. There is no way of removing metallic impurities once raw materials have been mixed into a slurry and then used to coat the current collector foil. Instead, contaminated electrodes are identified and discarded. This makes it important for materials acceptance inspection to understand the composition of those materials before they enter the production process, and that inspection is performed for cathode material, anode material, and electrical conductivity promoter.
X-ray particle contaminant analyzers are an effective means of inspecting for metallic impurities in the carbon-based anode material and electrical conductivity promoter in a way that takes advantage of the capabilities of transmission X-ray imaging(8). Detection of metallic impurities is made easier by the fact that these carbon-based materials are highly transparent to X-rays whereas the metallic impurities are not.
To test metallic particle detection and elemental composition analysis, acceptance inspection was simulated using 15 g of carbon black in a low-density polyethylene bag (A4 size with a thickness of 0.04 mm).
Using the EA8000A X-ray particle contaminant analyzer, the detection of metallic impurities in the carbon black by means of transmission X-rays took about seven minutes (see Figure 2). The automated process involved: (1) Analyzing the transmission X-ray image to detect contaminants, (2) Using fluorescent X-ray analysis to determine the elemental compositions at the locations where a contaminant was identified, and (3) Generating an inspection report. The results listed the number and sizes of the particles identified in the transmission X-ray image and the elemental compositions of each impurity obtained by fluorescent X-ray analysis.
SEM/EDX systems are used to detect and analyze particulate contamination in raw materials such as cathode material, anode material, or electrical conductivity promoter. For cathode materials in particular, this requires the ability to distinguish between the metal oxides that make up the material itself, the metallic particles that are the main cause of short-circuits, and metal oxide particles that are contaminants. To identify contamination, the system detects particles by means of composition contrast in the SEM image and uses EDX detection of light elements to distinguish between the different particle types with similar composition. The analysis techniques and objectives are the same as in the process control example described below.
Process Control (Inspection for In-process Dust))
Figure 3 — Use of SEM for Particle Analysis and Reporting in ISO 16232 Format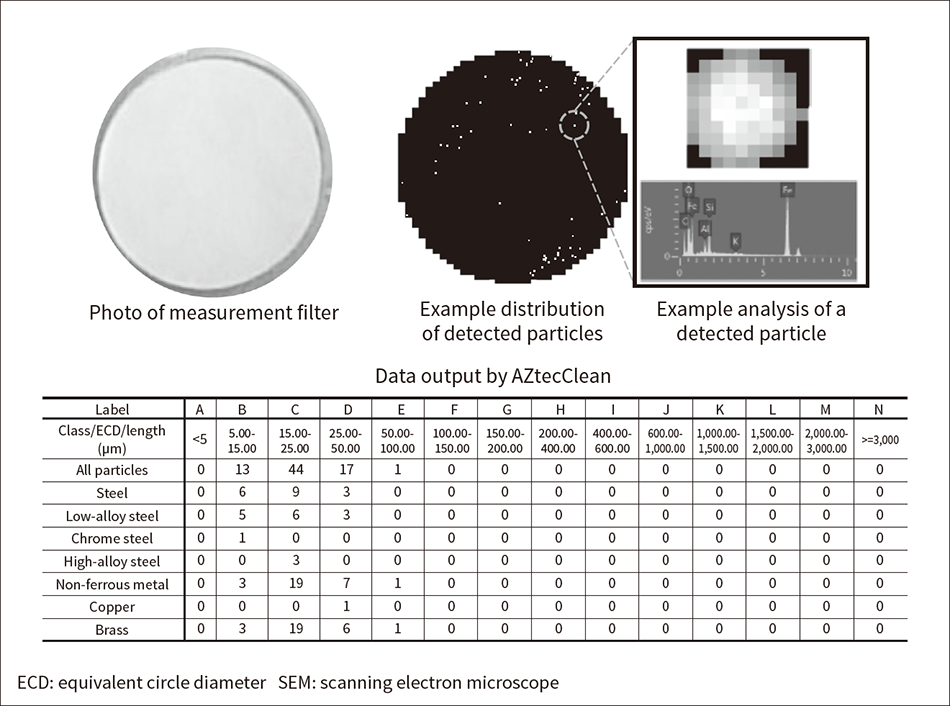 Analysis classifies particles based on their number, size, and elemental composition so as to determine whether these impurities pose a risk to the end product. The results are output in a report that complies with the international standard.
While efforts to deal with the presence of metallic impurities in incoming materials are being stepped up as LIB production increases, detecting and eliminating all of these contaminants is difficult. This makes the detection of impurities upstream of the production process likewise important. There is also the issue of dust generated by machinery used in the LIB production process itself. These can be a cause of product defects if not adequately removed or collected. This makes monitoring for metallic impurities in the production process an important task for minimizing defects and avoiding poor yield.
X-rays are the best way to inspect for metallic impurities in electrode plate product. A line X-ray inspection system equipped with the newly developed high-speed/high-resolution TDI camera is easily able to detect any metallic impurities contained in electrodes as they move through the production line at high speed. Use of this X-ray inspection system to detect impurities was tested at a line speed of 100 m/min using samples created for this purpose by affixing 50-µm iron particles to 3D cathode plate with a 150-µm electrode thickness (dimensions are approximate). The results demonstrated that the new X-ray inspection system is capable of real-time monitoring for metallic impurities in the electrode plate production process, with the iron particles used to simulate impurities being successfully identified more than 95% of the time.
In terms of controlling impurity levels, a requirement to comply with the ISO 16232 international standard for the cleanliness of automotive components is becoming increasingly common. This is also true in LIB manufacturing, where the requirement is able to be met with the help of special-purpose software by using SEM/EDX for the analysis of contaminants. The collection of dust emitted from production machinery and its testing and analysis are important tasks for process monitoring and control.
When SEM/EDX is used for this purpose, double-sided tape or filters are used to directly or indirectly collect the particulate matter emitted in the production process so that it can be analyzed. Specifically, double-sided carbon tape is used because of its excellent conductivity and minimal impact on the analysis. Likewise, Isopore* membrane filters are used because of their flatness and robustness when exposed to an electron beam.
Figure 3 shows an example analysis of a sample that was created by mixing residue from the polishing of plastic, ceramic, metal, and other materials in fluid to simulate particle contamination, and then collecting the contaminants on a 47-mm diameter filter. As the SU3900 features a large sample chamber, six of these 47-mm filter membranes can be placed in the instrument for analysis. The six contaminated filters were loaded into a sample holder and an EDX particle analysis performed. The automated measurement process takes approximately two hours to collect the 1,161 scans needed to cover a single filter membrane, which equates to about 12 hours in total to analyze all six. This obtains information about the shapes of the detected particles (length and aspect ratio) as well as their composition. The information is then used to classify the particle types. The analysis results are output in a format that complies with the ISO 16232 standard for parts cleanliness testing using the AZtecClean(9) software supplied by Oxford Instruments plc specifically for this purpose.
The height and other information about the 3D shape of the metallic contaminants is important for minimizing the risk they pose of causing internal short-circuits. To provide this information, 3D analysis software is used for the particle analysis, conventionally measured in two-dimensional (2D) analysis, to determine the height (see Figure 4). In addition to its existing functions for 2D measurements such as particle diameter, the Hitachi map 3D software is also able to indicate the rough shape of particles and determine their height (see Figure 5). In this way, more precise control of impurities can be achieved by utilizing this information to conduct detailed investigations and to predict the risk of metallic impurities causing battery short-circuits.
Figure 4 — Analysis of Impurity Heights Determined by SEM Particle Analysis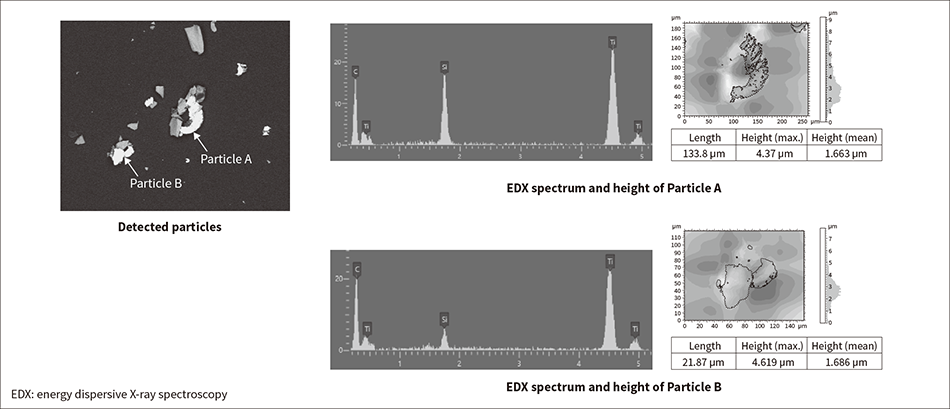 Using the Hitachi map 3D software, the heights of detected impurity particles can be determined without having to tilt the sample.
Figure 5 — Hitachi Map 3D Software for 3D Measurement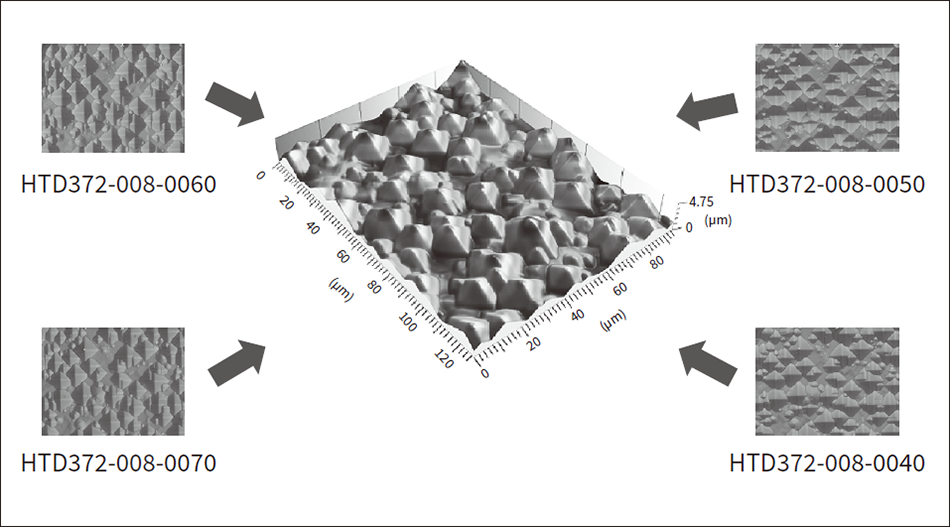 The Hitachi map 3D software uses the signal from the four-segment backscattered electron detector to calculate the surface shape from four directions and build a three-dimensional model without having to tilt the sample or align the fields of view.
- *
- Isopore is a registered trademark of Merck KGaA.
Conclusions
In addition to determining whether incoming materials are safe to be used in production or whether they are contaminated with impurities, acceptance inspections in LIB manufacturing also assess the effectiveness of magnetic separation. In the past, the extent of contamination by metallic impurities was determined on the basis of their concentration in the material. The problems with this, however, included the small amount of material able to be sampled for testing, the time taken for analysis, and the extent to which results correlated with the defect rate. In response, Hitachi High-Tech has offered a means of rapidly testing materials for metallic impurities in a way that can also determine the number and diameter of contaminant particles. Moreover, as the new X-ray inspection system that is able to inspect all electrode material also demonstrated the level of effectiveness, the company is confident that they have expanded the range of options for implementing efficient impurity control measures.
Future plans include further improving detection accuracy for those metallic impurities that are a genuine cause for concern from monitoring for metallic impurities in the electrode production process in real time using X-ray inspection systems, and from 3D analysis of metallic impurities using the Hitachi map 3D software for SEM/EDX. Hitachi also intends to make LIB manufacturing even more efficient and to fulfil the need for reliability in the supply of LIBs by improving the monitoring and control of metallic impurities in upstream processes so as to reduce the level of post-aging defects and the number of batteries that are rejected.
REFERENCES
- 1)
- Sogo Planning, Inc., “Latest Trends and Future Forecasts of Electric Vehicle-related Markets for 2020” (Feb. 2020) in Japanese.
- 2)
- A. Hammami et al., “Runaway Risk of Forming Toxic Compounds,” Nature, 424, pp. 635–636 (Aug. 2003).
- 3)
- A. Kamiyama, “Reliability and Safety of Lithium Ion Battery,” The Journal of Reliability Engineering Association of Japan, 40, pp. 196–203 (Jul. 2018) in Japanese.
- 4)
- A. Yoshino et al., “High Safety and Evaluation Technologies in Lithium-ion Batteries for xEV,” CMC Publishing Co., Ltd., Tokyo (Apr. 2017) in Japanese.
- 5)
- N. Yamamoto et al., “Development of High-Reliability, High-Capacity, Lithium-Ion Rechargeable Battery (Nickel-Based Oxide Cathode) and Battery Module for Energy Storage Systems,” Panasonic Technical Journal, 56 (2), pp. 16–20 (Jul. 2010) in Japanese.
- 6)
- W. Zhao et al., “Modeling Internal Shorting Process in Large-Format Li-Ion Cells,” Journal of the Electrochemical Society, 162, pp. A1352–A1364 (Apr. 2015).
- 7)
- Japan Quality Assurance Organization, “FY2019 Report on R&D Projects for Establishment of Technical Standards for Industrial Safety, etc. (Study on Safety Standards for Electric Products with Lithium-ion Storage Batteries)”(Mar. 2020) in Japanese(PDF Format, 9.08MByte)
- 8)
- K. Shinohara et al., “Application of X-ray Technology for Improvement of Internal Short Circuit Reduction of Lithium-Ion Rechargeable Battery,” Advances in X-ray Chemical Analysis, Japan, 47, pp. 279–292 (Mar. 2016) in Japanese.
- 9)
- Oxford Instruments, “AZtecClean”


